07データベース / Database
【目次/TOC】
1. Excelを用いたデータ操作のための概念/Concepts for Data Manipulation Using Excel
7.1.1 クエリ/Query

本ウェブページは『超入門 はじめてのAI・データサイエンス』第7章に対応しています。Excelを用いたクエリのイメージづけのために,パワークエリ(Power Query)を操作しているところをお見せします。Macをお使いの方は,パワークエリの操作がMacではWindowsと同様にはできないので留意してください。(Win)Excelでは,リボンのデータにパワークエリの機能が入っています。Macでも利用可能なMicrosoft社のBI(ビジネスインテリジェンス)ツールであるPower BIがすでに発達しているので,ここでPQをお見せするのはPQを使う必要性からというよりは,Excelからパワークエリに入ったり戻ったりする様子をお見せして,クエリのイメージを掴んでもらうためです。
This webpage corresponds to Session 07 of the English website. To give you an idea of query with Excel, we will show you Power Query (PQ) in action. Mac users should keep in mind that PQ is not available on Mac as they are on Windows. (Win) In Excel, PQ is available from the Data ribbon. Power BI, a business intelligence tool provided by Microsoft, is already developed and available for Mac, too, so I show PQ here not because of the need to use PQ, but rather it is easy to get an idea of query if you see how to enter and return to PQ from Excel.
下の動画では,クエリ上でのデータ取得のイメージづくりため,パワークエリのさまざまな機能のうち,列の操作を紹介しています。Excelから一旦離れて,クエリの中でデータの取得と変換が可能で,パワークエリはそのプロセスも記録してくれます。『超入門 はじめてのAI・データサイエンス』ではクエリの概念を理解すればよいセクションなので,以下の説明と動画は関心のある人のみ参考にしてください。
To give you an idea about the selection of data on query, we will show you the manipulation of columns among various features of PQ in the video below. PQ in Excel allows to handle data within a query away from Excel and enables to select and transform data. PQ also records the process. Understanding the concept of query is enough here, so please refer to the video and its explanation below only if you are interested.
動画のタスクは,年度と番号が合体している請求書の番号を,年度の列と番号だけの列に分割することです。 ただし,支店のセルが結合されているという問題があります。動画では,まず,セルの結合を解除していますが,そうすると結合されていた部分の最上部のセルのみに支店の名前がはいり、その下は空欄のセルになってしまいます。 そこで空欄をうめるタスク,そして請求書の番号を分割するタスク,この2つのタスクを,PQで解決しています。その手順はつぎのとおりです。
The task in the video (it is a demostration video and only in Japanese) is to split the invoice codes into year and number. There is a problem, though: the cells are merged. When the cells are unmerged, only the top cell contains City names, and the cells below it are blank. The video shows the way of handling the two tasks in PQ: filling in the blanks and dividing the invoice numbers. The procedure is as follows.
PQでクエリを出現させるにはまず,加工したい表の中のどこでもよいのでカーソルで選び,上の図の赤い丸で示された「テーブルまたは範囲から」をクリックすると,クエリで扱うデータ範囲を問われるので, 範囲を確かめて「OK」で進みます。すると,クエリが出現します。
To open a PQ query, first select with the cursor anywhere in the table that you want to connect to PQ, then click on "From Table/Range" indicated by the red circle in the image above. Confirm the range and click "OK" to proceed. Then PQ will appear.
ExcelとPQの違いに,クエリのリボンは,上図のようにクエリ専用のリボンであること,空欄がnullという欠損値に変換されること,クエリは列の操作専用でセルの操作ができないことがあります。 たとえていえば,クエリは在庫管理調整用の倉庫なので,そこでは個々の商品を開封できません。入荷した商品は,種別に梱包されたまま整理されます。データでいうと「種別」梱包は列,個々の商品はセルに相当するので,クエリでできるのは列の操作のみです。
The difference between Excel and PQ is that the query ribbon is a query-only ribbon, as shown above; blank fields are converted to null, a missing value; and queries are for column operations only, not cell operations. To use the previous metaphor, the query is a warehouse for inventory control, so individual boxes cannot be opened there. The incoming goods are organized by type of packing. In terms of data, a package and its "type" corresponds to a column and the individual goods correspond to cells, and the query can only operate on columns.
まず第1のタスクである,空欄を埋めるタスクについて,動画ではカーソルで支店の列を選び,クエリのリボンの変換から,フィルそして「下」を選んでいます。福岡支店(FKO)から東京支店(TKY)まで,簡単にセルが埋まりました。
For the first task of filling blanks, the video shows selecting the City column and choosing Fill and "Down" from the query ribbon's transformations. From Fukuoka branch (FKO) to Tokyo branch (TKY), the cells were easily filled.
次に動画では,第2のタスクである,列の分割を行っています。手順は,請求書番号の列をカーソルで選び,リボンの列の分割の中から,今回は,スペースで分割したいので,「区切り記号による分割」を選んでいます。 区切り記号は「スペース」で,この場合はスペースは1か所なので分割位置はどれを選んでも良いため,そのまま「OK」で実行しています。 「請求書番号(ハイフン)1」,「請求書番号(ハイフン)2」の,2列ができたので,列の名前をダブルクリックして,「年度」と「請求書番号」に列名を変えています。
In the next video, the second task of dividing columns is performed. This time we want to divide by a space. The procedure is to select the column for invoice codes, and from Divide Column on the ribbon, select "Division by Separator". The delimiter is "space", and it does not matter which position is selected for the division, just click "OK" to execute. Two columns "Invoice Code-1" and "Invoice Code-2" are created, so double-click the column names and rename them to "Year" and "Number".
クエリの名前を「支店別請求書」としています。右側の「適用したステップ」が増えて,プロセスが記録されています。さて,タスクを完了したので,これをExcelに読み込みます。クエリリボンのホームに戻り,閉じて次[に]読み込むを選んでクエリを閉じて,次の場所に読み込んでいるのです。 動画では,元のExcelに新しいシートを作ってそこに読み込むため,「新規ワークシート」のままで「OK」にしています。元のExcelに新しくクエリの名前のシートができました。
The name of the query is set to "Invoices by Branch". On the right side, the "Steps applied" has increased and the process has been recorded. Now that we have completed the task, we will load it into Excel. We are returning to the home of the query ribbon, selecting Close and Load to close the query and load it to Excel. In the video, I left "New Worksheet" as "OK" because I wanted to create a new worksheet in the Excel workbook and load it there. A new worksheet with the name of the query is created in the Excel workbook.
動画で「更新」について見せている部分についてです。ほぼタスクを完了したのち,ひとつのセルが空欄になっているとき,動画では,元のExcelに移動して,関数をコピーして空欄を埋めました。クエリのシートに戻っても,元データの変更はそのままでは反映されないのですが,更新で自動反映させることができます。 クエリのテーブル上で右クリックすると更新があるので,これをクリックしても良いですし,または,リボン右のテーブルデザインのさらに右に「クエリ」という項目があるので,ここから「更新」を選ぶと,元のシートでの変更が反映されます。 いったん閉じたクエリも、クエリとの接続で該当のクエリをダブルクリックすれば,いつでも接続できます。なお,クエリの数式バーに見えるのがM言語と呼ばれる言語です。数式バーが見えない場合は、リボンから表示させることができます。 クエリと再接続してから,特に新たなステップは加えていない場合は,閉じるときに読み込む必要はありません。単にウィンドウ画面を閉じればクエリとの接続が閉じられます。
Now, about "Refresh". The video shows when the task is almost completed but one cell was blank, I went back to the Excel worksheet and copyied the function to fill in the blank. When I went back to the query, the changes in the Excel data were not reflected, but could be automatically reflected by Refreshing. You can right-click on the table of the query and see Refresh, or you can select "Refresh" from the "Query" menu, to the right of Table Design in the ribbon, which will reflect the changes in the Excel data. Once a query is closed, you can always connect to it by double-clicking on the corresponding query in Queries & Connections. Note that the language called M language is visible in the formula bar of the query. If you cannot see the formula bar, you can display it from the ribbon. If you have not added any new steps since reconnecting with the query, you do not need to load it when closing. Simply close the window and the connection to the query will be closed.
7.1.2 結合/Merge
結合は理解しておきたい概念です。結合の種類には,左外部 (left-outer),右外部 (right-outer), 完全外部(full-outer),内部 (inner), 左反 (left-anti), 右反 (right-anti), クロス (cross)があります。 次の動画では、架空の学生データを,クエリのマージを使って統合しているので視聴してください。 ここでのタスクは,資格を得るための研修をうける学生を特定するのに,これまでに研修を受けていない人の中で、まだ資格を取得していない人を抜き出すというタスクです。 ひとつのファイルには,資格の有無のデータが入っていて,そのデータを読み込んだクエリには「資格」という名前を付けています。もうひとつのファイルには,これまでに研修を受けていない人のデータが入っていて,そのデータを読み込んだクエリには「要研修」という名前を付けました。 「要研修」のクエリからクエリのマージを選んでいます。マージダイアログボックスでは,上部にすでに「要研修」が入っているので,下部にマージすべき「資格」を選びます。マージするときには,学籍番号を照合してデータを統合したいので,それをキー変数,ここでは照合列として学籍番号を選んでいます。 マージウィンドウ内の上を左,下を右として,マージの種類は下の図の関係になります。
Merge is a concept you might want to understand. There are several kinds of merge such as left outer, right-outer, full-outer, inner, left-anti, right-anti, cross. Watch the video below, in which fictitious student data is presented to show you how to merge queries. The task here is to identify students who should receive training by extracting those who have not yet been trained and not yet acquired the qualification.. One file contains the data on the qualifications and the query for the data is named "Qualifications". The other file contains data for those who have not received any training so far, and the query for that data is named "Training Required". I selected Merge Queries from the "Training Required" query. In the Merge dialog box, "Training Required" is already in the top, so I select the "Qualifications" into the bottom to be merged with it. When merging, I want to merge data by matching student ID, so I choose student ID as the key variable, the matching column. With the top in the merge window indicating "the left" and the bottom indicating "the right", the merge types have the relationships shown in the image below.
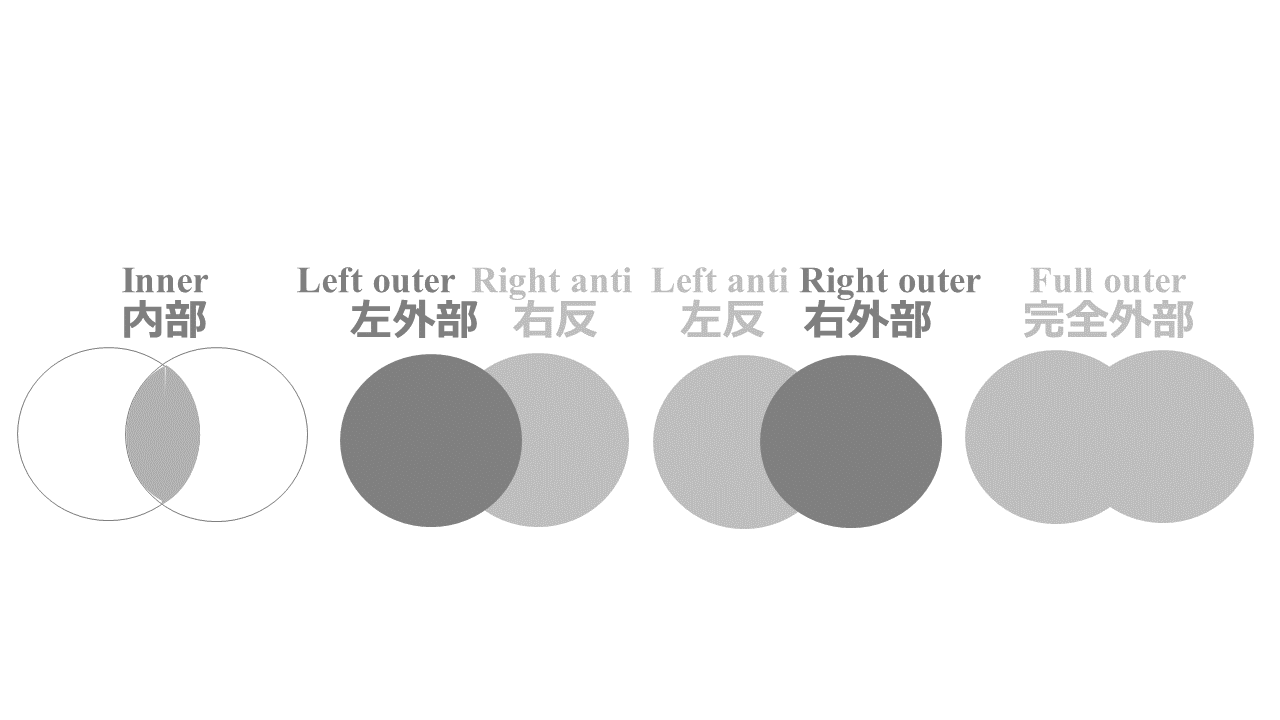
動画の場合は,「要研修」(左)の中で,すでに資格を持っている人(右)を除外したかったので,左反を選んでいます。そしてExcelに閉じて読み込むにすると,N=795だったデータから150人除外されてN=645となった「要研修」のシートが出来ました。動画を視聴してパワークエリによる結合のイメージを掴めたらこのセクションは終了です。
In the case of the video, I wanted to exclude those who were already qualified (right) from the "Training Required" (left), so I chose Anti-Left. Then I close and load it into Excel, and I got a worksheet for "Training Required" with N=645, excluding 150 people from the data that had N=795. If you have watched the video and get an idea of the PQ merge, that's it for this section.
2. SQL & NoSQL
このセクションにはコードも動画もありません。
There aren't codes or videos for this section.
3.SQLを使ってみよう/Let's Try SQL
RDBMSには,Oracle DatabaseやMicrosoft SQL Serverのように商用のものもあれば,MySQLやPostgreSQLのように無償のものもあります。ここでは無償のSQLiteでSQLを使ってみます。 まずSQLiteをこちらからダウンロードします。各自のPCのOSに合わせてダウンロードしてください。Macの場合はzipファイルを1つダウンロードすれば良いですが,Windowsでは2つ必要です。下の動画はWindowsへのインストールの方法です。ダウンロードしたらzipファイルを解凍してください。上手く解凍できない場合は,7-zipをインストールしてからzipファイルを右クリックして「ここに展開」を選んでください。デスクトップにsqlite3というフォルダを作って,解凍して得られた全てのファイルをその中に移動します。
Some RDBMS are commercial, such as Oracle Database and Microsoft SQL Server, while others are free, such as MySQL and PostgreSQL. Here we will use SQL with SQLite, which is free. First, download SQLite from here. Select the one that suits the OS of your PC. Mac requires only one zip file to download, but Windows needs two. The video below shows the installation for Windows. Unzip the downloaded zip file. If you have problem unzipping the zip files, use 7-zip to right-click the zip file and choose "Extract Here". Create a folder named "sqlite3" on your desktop, and move all the extracted files into it.
次にGUI(グラフィカルユーザインターフェース)ベースでSQLiteを操作することのできるDB Browser for SQLiteをダウンロードします。ちなみに本授業の目的はSQLという言語を使ってみることであって,GUIでグラフィカルにデータベースを操作することではないので,DB Browser for SQLiteはSQLコードの実行結果を確認したりする目的で用います。 こちらからダウンロードしましょう。各自のPCに合わせてダウンロードしてください。ダウンロードしたファイルをダブルクリックしたら,基本的にNextボタンで先に進んでインストールしてください。適宜,デバイスの変更を許可して進めてください。
Next, download DB Browser for SQLite, a GUI (graphical user interface)-based tool for manipulating SQLite. The purpose of this course is to try using the SQL language, not to manipulate databases graphically with a GUI, so DB Browser for SQLite is mainly used to check the execution results of SQL code. Download from here. Download the file according to the OS of your own PC. After double-clicking the downloaded file, keep clicking the Next button to proceed with the installation. Allow the device to change as appropriate.
Video with English subtitles
それではSQLiteを使ってみましょう。ここで学びたいのはSQLiteデータベースをGUIで管理するDB Browser for SQLiteアプリの操作に慣れることではなく,SQLの言語を用いて操作する経験をすることです。
SQLではセミコロン(;)までがひとつの SQL 文として認識されるので,; まで入力してから実行します。大文字と小文字はあくまでもコードをわかりやすくするために使い分けるもので,SQL側では大文字と小文字は区別しません。通常はコマンドを大文字で書き,テーブル名やカラム名は小文字にしておくのが一般的です。コマンドを半角で書くのはExcelやPythonと同じですが,SLQはコマンドが半角スペースで区切られるので,区切りのスペースを誤って全角スペースにしないようにしましょう。
以下の項目を実習してみます。
Let's try using SQLite. What is important to learn here is not to become familiar with DB Browser for SQLite, which manages SQLite databases via GUI, but to gain experience operating with the SQL language.
In SQL, a semicolon (;) is recognized as the end of a single SQL statement, so type up to ; before executing. The uppercase and lowercase are used only to make the code easier to understand, and SQL is case-insensitive. It is common practice to write commands in uppercase, while table and column names in lowercase. You must write commands in single-byte characters as in Excel and Python. In SLQ, commands are separated by single-byte spaces, so be sure not to accidentally use full-width spaces as separators.
You will practice the followings.
7.3.1 テーブル/Table
SQLiteで2つのcsvファイルを読み込んでテーブルを作成し,kingakuとcustomerというテーブルを作成します。 SQLのフォルダにkingaku.csvとcustomer.csvを入れておきましょう。新しいデータベースを作ってtool1という名前にしたら,「テーブルの定義を編集」はキャンセルして,「ファイル」の「インポート」から「CSVファイルからテーブルへ」を選び、「CSVファイルをインポート」というダイアログボックスで「先頭行をカラム名に」などの設定をしてOKボタンを押すとkingakuというテーブルが作成されます。ちなみに,csvファイルではないテキストファイル,たとえばtsv(tab-separated values)であってもここを選び,ダイアログボックスで「フィールド区切り」を「タブ」に設定すれば大丈夫です。日本語で文字化けが起きた場合はダイアログボックスの「エンコード」から「その他」を選んで,Shift_JISと入力しましょう。
Let's import the two csv files in SQLite and create tables called kingaku and customer. Put kingaku.csv and customer.csv in the SQL folder. After creating a new database and naming it tool1, cancel "Edit table definition," select "Import" from "File" and "Table from CSV file," and in the "Import CSV file" dialog box, do necessary setting such as checking "Column names in first line" and press the OK button, then a table named kingaku is created. By the way, even if you are importing a text file that is not a csv file, such as tsv (tab-separated values), you can select this option and set "Field separator" to "Tab" in the dialog box. If you have Japanese characters garbled, select "Other" from "Encoding" in the dialog box and enter "Shift_JIS".
もし間違ってやり直しかったらデータベースを切断して破棄しても良いですし,いざというときには下記コード1でテーブルを削除することもできます。
If you made a mistake and want to import data again, just disconnecting the database will do, or you can delete the table with the following code-1.
DROP TABLE
    kingaku
;
テーブル定義の変更はALTER TABLEで行います。下記コード2はカラム名の変更で,paymentというカラム名をamountに変更します。「データ閲覧」で列名が変わっていることが確認できます。
ALTER TABLE is used for modifying table definitions. Code-2 below changes the column name "payment" to "amount". In "Browse Data", you can check if the column names have been changed.
ALTER TABLE
    kingaku
RENAME COLUMN
    payment
TO
    amount
;
「変更を書き込み」でテーブルへの変更を保存します。保存しないと変更は破棄されます。なおツールⅠの対象はデータ分析を行うユーザーなので,分析者は基本的に元データには変更を加えず,query(照会)して取得したデータを分析するのみであることをは心得ておきましょう。なお,SQLのコードで,COMMITで終わるコードを見かけることがあるかもしれません。COMMITはSQLでテーブルに加えた変更の確定処理を行うコマンドで,COMMITで実行が確定されるまでの一連のSQLの処理はトランザクションと呼ばれます。DB Brower for SQLiteでは,「変更を書き込み」がcommitに相当します。
Save the changes to the table in "Write Changes". If you do not save the changes, they will be discarded. Since Tool I is intended for users who analyze data, keep in mind that analysts basically do not make any changes to the original data, and only analyzes data obtained by querying the database. You may sometimes see SQL codes ending with COMMIT, which is a command to finalize the changes made to the table in SQL, and the series of SQL processing until the execution of COMMIT is called transaction. In BD Brower for SQLite, "write changes" is equivalent to COMMIT.
7.3.2 選択,射影,結合,演算/Selection, Projection, Join, Calculation
SELECT文では,データベースのテーブルはそのままでデータを取得することが可能です。下記コード3はSELECT文を使った選択(selection)です。データベースの用語で「選択」とはレコードを選択して取得することです。SELECT文を用いて,FROM句でcustomerというテーブルから,numberカラムの値が10847のレコードの*(=すべての)列を選択します。
SELECT statement allows us to query data while leaving the database intact. Code-3 below uses the SELECT statement to perform the selection. Selection in the database terminology means selecting rows. Using the SELECT statement with the FROM clause allows you to select * (= all) columns of the record from the table named "customer", whose "number" column has the value 10847.
SELECT *
FROM customer
WHERE number = 10847
;
つぎは,射影 (projection)です。行の条件抽出をした上記の「選択」に対して,「射影」とは列を取得することを言います。下記コード4ではcustomerテーブルのfirst_nameとfamily_nameのカラムをSELECT文で取得します。
The next is projection. In contrast to the above "selection," which is a conditional extraction of rows, "projection" is used to query columns. With a SELECT statement in code-4, you can query the first_name and family_name columns of the "customer" table.
SELECT first_name, family_name
FROM customer
;
下記コード5では,SELECT文を用いてcustomerのnumberカラムの値が10847のレコードのfirst_nameとfamily_nameを取得します。
Code-5 below use the SELECT statement to get the first_name and family_name of the record with a value of 10847 in the customer's number column.
SELECT first_name, family_name
FROM customer
WHERE number = 10847
;
下記コード6ではkingakuとcustomerを結合 (JOIN)して,それをinvoiceというテーブルに格納します。手順としてはまずinvoiceというテーブルをCREATEで作成し,kingakuの行番号(rowid)とcustomerのid列を結合キーとしてkingakuテーブルとcustomerテーブルを結合したデータをinvoiceとします。
The next code-6 uses JOIN to concatenate "kingaku" and "customer" and store them in a table called "invoice". The first step is to create the table "invoice" by CREATE, then join the "kingaku" table and the "customer" table using the row number (rowid) of "kingaku" and the id column of "customer" as the join key, which makes "invoice".
CREATE TABLE invoice AS
SELECT *
FROM kingaku
JOIN customer ON kingaku.rowid = customer.id
;
下記コード7は,演算を行い円をドルに換算してそれを新しい列に追加します。テーブル定義を変更するALTER TABLEを使います。ADD COLUMNで新しい列を追加し,そのカラムの値のデータ型を浮動小数点型(REAL)に定義します。UPDATEで新しく追加したdollarカラムの値をamount/140(本執筆時のレート)の戻り値にしてテーブルを更新します。
The next code-7 does calculation to convert yen to dollars and add the values to a new column. Use ALTER TABLE to change the table definition; ADD COLUMN to add a new column and define the data type of the values in that column to be floating point type (REAL). And then the table is updated with the newly added dollar column with the return values of amount/140 (the exchange rate at the time when the Japanese textbook was written).
ALTER TABLE invoice
ADD COLUMN dollar REAL
;
UPDATE invoice
SET dollar = amount/140
;
7.3.3 集計と行の並べ替え/Aggregation and Sorting
つぎのコード8は集計です。支店ごとのinvoiceテーブルのamountの支店ごとの平均値を出します。SELECT文に,FROMとGROUP BYが続いています。
The next code-8 is to aggregate data. It produces the average of amount per branch in the INVOICE table by a SELECT statement, followed by FROM and GROUP BY.
SELECT branch,AVG(amount)AS avg_amount
FROM invoice
GROUP BY branch
;
下記コード9では四捨五入(に近いまるめ)をするために,ROUND(値, 小数点桁数)に平均値を入れています。
To round to the nearest whole number, the code-9 puts the average value in ROUND(value, decimal place).
SELECT branch,ROUND(AVG(amount),1)AS avg_amount
FROM invoice
GROUP BY branch
;
SELECT文のORDER BYという句を使った行の並べ替えです。下記コード10はamountの大きい順に並べます。
The following code-10 uses the ORDER BY clause in the SELECT statement to sort the rows in descending order.
SELECT*
FROM invoice
ORDER BY amount DESC
;
SQLファイルをtrialという名前で保存しておきます。
Save the SQL file as "trial".