04 プログラミングと基本のアルゴリズム / Python Programming and Basic Algorithms
【目次/TOC】
- Colabの使い方
How to Use Colab - はじめてのPython
Python for Beginners - 基本アルゴリズムのフローチャート
Flowcharts of Basic Algorithms

ここでは,最初に Google Colaboratory (通称 Colab) に入って,Python の世界のみなさんに Hello と挨拶します。そして Python の基本を学んでいきます。アルゴリズムを図で表現するフローチャートについても説明します。
Here, we will first enter Google Colaboratory (a.k.a. Colab) and say Hello to the world of Python. Then you will learn the basics of Python. You will also learn about flowcharts, which are graphical representations of algorithms.
1. Colabの使い方/How to Use Colab
Colabでは,Google のクラウドサーバーでコードを実行できます。制約もありますが,環境構築が不要なので,python入門者にはうってつけです。それではColabに入ってください。
Colab allows you to run your code on Google's cloud servers. There are some limitations, but using Colab is a great way to get started with python because you don't need to build an environment. Let's go to Colab.
Colab を開いたら,「ノートブックを新規作成」をクリックしてください。Google Drive の中に入って左上の「ドライブ」の下の「+ 新規」の選択肢から Google Colaboratory を選んでも新規のノートブックを作成することができます。そしてノートブックのファイ ル名を好きなファイル名に変更します。
After opening Colab, click on "NEW NOTEBOOK". You can also create a new notebook by entering Google Drive and selecting Google Colaboratory from the "+ New" option under the Drive icon in the upper left corner. Then rename the notebook to a file name of your choice.
セルにはテキスト入力とコード入力があります。テキストセルにはmarkdown記法で,コードセルにはPythonコードで入力します。それでは入力してみましょう。テキストには「Pythonの世界にご挨拶」と入れましょう。コードには,print("Hello World!")と入れて実行してみましょう。次のコードはコード1です。
printは,引数を表示するpythonの関数です。その後の丸カッコ()の中に引数を入れます。今回は文字列を入れるので,Excelと同じように,Pythonでも文字列を""で囲います。
実行して Hello World! が表示されたら成功です。もしエラーが出たら,単なるタイプミスでしょうから,落ち着いてコードを書き直して再度実行してみてください。
ファイルを保存します。ファイル > 保存,あるいはCtrl or ⌘ + S で保存すれば,Google Driveに保存することができます。
なお,「すべての変更を保存しました」と出ていたら,すでにファイルがGoogle Drive上に保存されているということです。
There are two types of cells in Colab: code cells and text cells. Please write texts using markdown in text cells and codes in code cells. Let's try using them. In a text cell, write "Greetings to the world of Python", and in a code cell, write print("Hello World!") like below and run it. The following code is code-1. The Python function print() displays the arguments, which are in the round brackets (). When you are entering a string, enclose the string in "" in Python just like in Excel. If you see Hello World! after running the code cell, it was successful. If you get an error, it is probably just a typo, so take a breath, and just overwrite the code, and run again.
Save the file. You can save the file to your Google Drive by pressing File > Save or Ctrl or ⌘ + S.
Note that if you see "All changes saved", the file has already been saved on the Google Drive.
print("Hello World!")
Colabのショートカットキー/Shortcut Keys in Colab
Colabでもショートカットキーを使うことができます。メニューのツール > キーボードショートカット で確認して使ってみてください。
There are many shortcut keys in Colab. Go to menu > Tools > Keyboard shortcuts and check them out.
English
2.はじめてのPython/Python for Beginners
さて,Colabを使えるようになったので,ここからは動画が少なくなり,実習のための埋め込みコードが多くなります。
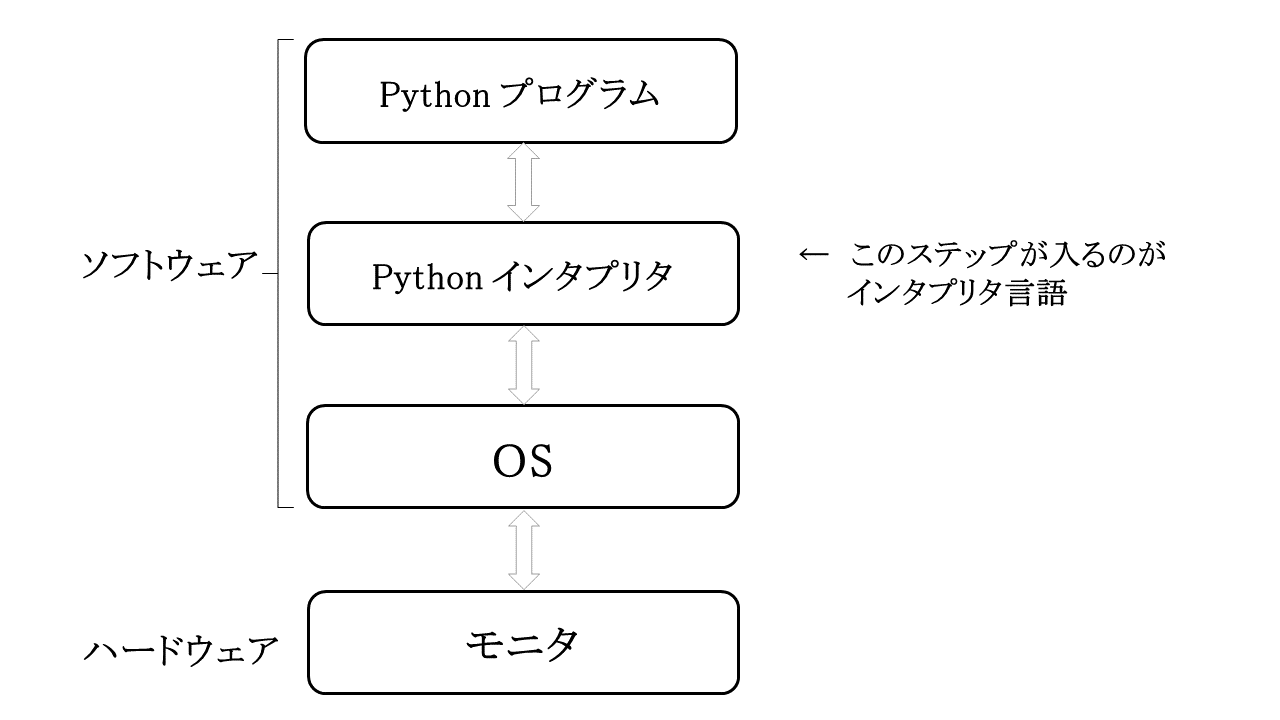
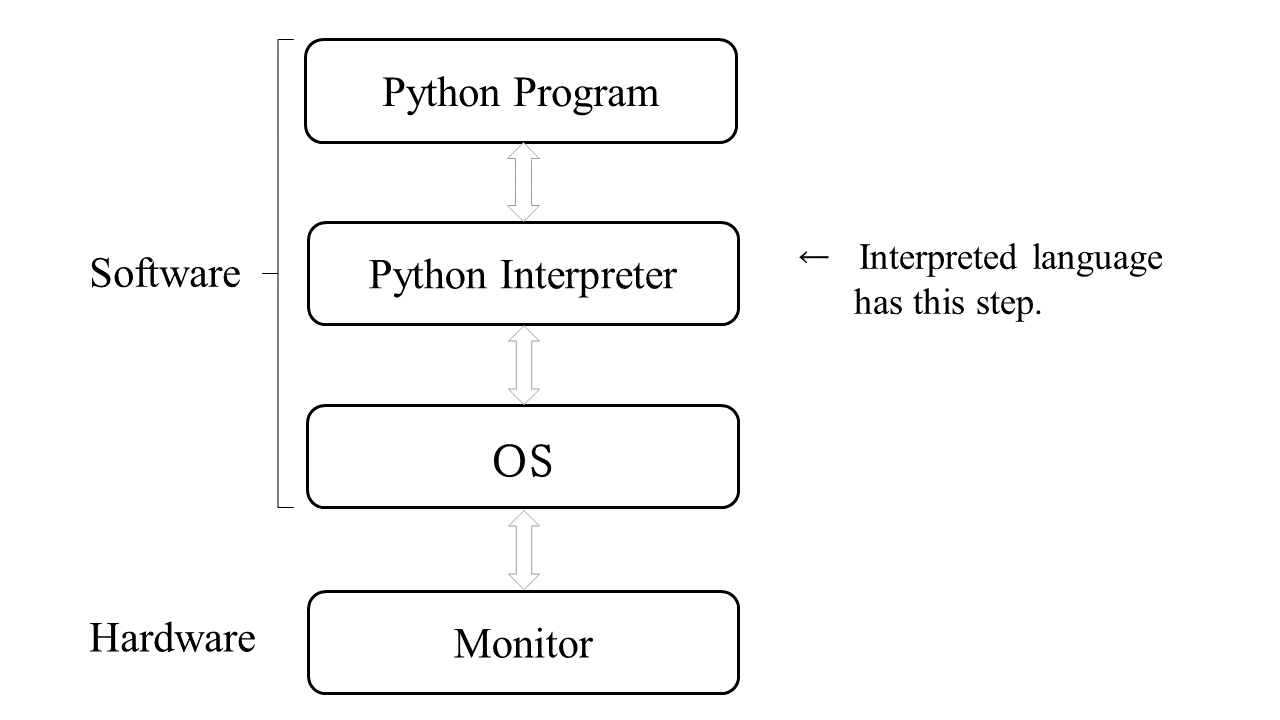
Pythonはインタプリタ言語と言われ,Pythonでプログラムを書いてもそれが OS上で直接実行されるわけではありません。
下図のようにインタープリタと呼ばれる別のプログラムがOSの言語に変換してプログラムを実行します。
Pythonプログラムを書きこむのに,シェルでコマンドプロンプトに対して直接書き込むこともできますが,拡張子.pyのつくファイルを作ってそれを実行してもらうこともできます。みなさんがすでにColabで作成したのは.ipynbという拡張子のファイルで,それはIPython Notebookの略,つまりノートブック形式のファイルです。開けるとJupyter Notebookと呼ばれる形式で,それまでの記録を再現してくれます。
それではPythonの実習に入るために,一旦閉じた.ipynbファイルを開いてみましょう。
Colabに入ると最初の画面でファイルの一覧が出るので,そこからクリックでファイルを開くことができますし,あるいは,Google Drive上に入って自分の保存したファイルをダブルクリックして開いても構いません。
Now that you are able to use Colab, there will be less videos from now on and more code for hands-on practice embedded in this website.
Python is an interpreted language, which means that even if you write a program in Python, it is not executed directly on the OS.
As shown in the image below, another program called interpreter converts the program into the OS language and executes it.
To write a Python program, you can write it directly to the command prompt in a shell, or you can create a file with a .py extension and have it run. What you have already created in Colab is a file with the extension .ipynb, which stands for IPython Notebook, i.e., a notebook-style file. When opened, it will reproduce the previous record in a format called Jupyter Notebook.
Now let's open the .ipynb file to begin our next Python practice.
When you open Colab, you will see a list of files on the first screen, and you can click to open the file, or you can also go into Google Drive and double-click on your saved file to open it.
組み込み型/Built-In Types
文字列と数値の違いについて,次のコードを試してみましょう。次のコードはコード2です。 下の2つあるコードの内,上のコードだと文字列と判断されて2+3が,下のコードだと数値の計算と判断されて5が,出力結果として表示されたと思います。 文字列として認識させるためのクォーテーションマークは,ダブルクォーテーションでもシングルクォーテーションでも同じなのですが,一般的な文字列(入力値を文字として扱って欲しい場合)はダブルクォーテーション,識別子として使用する場合(変数名など,何かを指す場合)シングルクォーテーションにしている例を多く見かけます。 自分の中で整合的に使っていれば,どの使い方が間違いということはありません。
Let's try the following code to see the difference between string and numeric. The following code is code-2. Of the two code lines below, the upper code is considered a string and 2+3 is displayed as the returned value, while the lower code is considered a numeric calculation and 5 is displayed. The quotation marks for strings can be either double or single, but many people use double quotation marks for entering strings and single quotation marks for identifiers, which are used to refer to an object name. As long as you use the quotation marks consistently, there is no wrong way to use them.
print("2 + 3")
print(2 + 3)
インデックス/Index
シーケンス型(sequence types)というのは,要素が一定の順番で並んでいる種類の型 のことで,リスト型(lists)もそのひとつです。リスト型は変数に相当するデータを格納することに用いるので,よく使われます。統計用語の変数は,IT 用語の変数が意味する PC 上の番地にクラス・オブジェクトを格納するときの「変数」とは(重なってはいますが)異なります。リストが統計学でいう変数として用いられるときには,その要素は一定の型の要素になりますが,Pythonのリスト型自体は異なる型の要素を含むことも可能です。
Sequence types are types in which the elements are arranged in a certain order. List is on of sequence types and is often used to store data equivalent to variables. A variable in statistical terminology is different from (though overlapping with) a variable in IT terminology, which is used to store a class or an object on a PC address. A list used for a variable in statistics consists of elements in a certain type, although list in Python can contain elements of different types.
それでは,インデックス(index)によるリストの要素の取り出しを実行してみましょう。例えば 3 つの要素が入ったリストの各要素のインデックス番号は,0, 1, 2 です。イン デックスは 0 から始まることを覚えておいてください。では下記のようにインデックスを 用いて n というリストから要素を取り出すと,どのような結果が出るでしょうか?次のコードはコード3です。
Now let's try to take out the elements of a list by index. The index number of each element in a list of three elements is 0, 1, and 2, for example. Remember that the index starts from 0. What would be the result if we extract elements from the list whose name is n using the indexes as follows? The following code is code-3.
 n = ["1番","2番","3番"]
print(n[0])
print(n[1])
print(n[2])
print(n[0:2])
 n = ["No.1","No.2","No.3"]
print(n[0])
print(n[1])
print(n[2])
print(n[0:2])
インデックスの-1 は最後の要素,-2 は最後から 2 番目・・・となります。また,コロン (:)はコロンの前の要素からコロンの後の要素の手前までという意味になります。Excel と違って,コロンの後の要素のひとつ手前までです。コロンで終われば最後の手前の要素まで,コロンから始めれば最初の要素からとすることができます。次のコードはコード4です。
The index -1 means the last element, -2 means the second from the last, and so on. A colon (:) means from the element before the colon to the one element before the element after the colon. Unlike in Excel, the range does not include the element specified after the colon. Starting with a colon means including from the first element. The following code is code-4.
 n = ["1番","2番","3番","4番","5番","6番","7番","8番"]
print(n[8])
 n = ["No.1","No.2","No.3","No.4","No.5","No.6","No.7","No.8"]
print(n[8])
要素が 8 つなので,インデックス 8 である 9 つ目の要素を取り出そうとするとエラーに なります。これに対して範囲の指定においては,存在しないインデックスを用いることが 可能です。コロンを 2 つ使って,「どこから:どこの手前まで:いくつずつ」という要素 の取り出し方で見てみましょう。これをステップといいます。ステップは,すべての要素のときには1,ひとつおきのときには 2,・・・となります。次のコードはコード5です。
Since there are eight elements, an attempt to get the ninth element at index 8 will result in an error. In contrast, it is possible to specify a range with an index that does not exist. Try a step index by using two colons to get the elements "from where: to where: by a step size". The step size of 1 gets every element, the step size 2 gets alternate elements, and so on. The following code is code-5.
print(n[0:-1:3])
print(n[1:8:2])
n[0:-1:3] の例ではコロンの前の 0 で「1つ目の要素から」,コロンの間の-1で「最後の要素まで」,コロンのあとの 3 で 3 ステップごとに(2つおきに)となっています。n[1:8:2] の例では,2 つのコロンの間に要素 8 という実際には存在しない値になっていますが,その手前までの実際に存在する要素で範囲の指定を可能にしています。この値はどんなに大きくても構いません。例えば,8 つの要素しかない変数に対して 55 番目の要素までの範囲を指定しても,それは可能です。コロンの前の-1 で「最後の要素から」,コロンの後の 55 でその手前の要素である 54 までの実際に存在する要素,つまり最後の要素である ‘8 番’ だけを取り出すことができます。次のコードはコード6です。
In the example n[0:-1:3], the 0 before the colon indicates "the first element," the -1 between the colons indicates "the last element," and the 3 after the colon indicates every three elements. In the example n[1:8:2], the 8 between two colons does not actually exist but this index works. The value can be as large as you like, such as 55 as follows, and this code index works even for a list with only 8 elements. The -1 before the colon allows you to specify "the last element" and the 55 after the colon allows you to take out only the elements actually present before 55, i.e., the last element, "No.8". The following code is code-6.
print(n[-1:55])
リストから指定した要素を削除することもできます。削除には del を用います。8 番まであった n から 3 番までの n に戻しましょう。次のコードはコード7です。
It is also possible to delete a specified element from the list. To do so, use del like the following, which will turn n from the list with 8 elements to n with 3 elements. The following code is code-7.
del n[3:]
n
四則演算,コメントアウト,変数と代入/Four Arithmetic Operations, Commenting Out, Variables And Assignments
Pythonの四則演算の演算子は+-*/で,これらはExcelと同じです。異なるのはべき乗で,Excelでは^でしたが,Pythonでは**です。また,整数除算の//と剰余の%も覚えておくと良いでしょう。次のコードはコード8です。Pythonを計算機代わりに使う方法はこちらを参考にしてください。
Four arithmetic operators are the same as Excel: +-*/. The power in Excel is ^, but that in Python is **. You might want to remember Integer division // and Modulo (remainder) % as well. The following code is code-8. To use Python as a calculator, refer here.
print(11//4)
print(11%4)
それではいくつかの項目を学んでいきましょう。第1に,パウンド記号(#:シャープ,ハッシュ)の行はコード中に実行をしてもコードとは認識されず,コメントと認識されるのでメモとして使えます。これをコメントアウトと言います。 以下をコードで実行しても,上の行はコメントアウトとなるので,下の行のみコードとして実行されます。次のコードはコード9です。
Let's start the first steps in Python. The first step is to comment out. Python recognizes lines starting with # (hash, sharp, pound) as comments, so they can be used as memos. If you run the following code, only the second line will be run as code with the first line commented out. The following code is code-9.
#print("2 + 3")
print(2 + 3)
第2に,変数にデータを代入するのに=を使うことです。プログラミングにおける変数とは,コンピュータ上でデータの値を格納する場所のことです。変数名=データ でデータを変数に格納できます。以下のように,自分で自分なりの文字列を変数に入れて,結合してみましょう。下記はコード10です。
ただし,文字列と数値の結合は出来ません。コンピュータ上の場所,つまり変数は,大文字と小文字を別ものと認識します。
変数名は、すべて半角小文字にしましょう。全角だとエラーになります。小文字にするのは慣習です。変数名はアルファベットまたはアンダーバー(_)から始めることが出来ますが,数字から始めることはできません。2文字目以降であれば数字も使うことが出来ます。
The second step is variable assignment. Use = to assign data to a variable. A variable in programming is a place on a computer where data values are stored. The command variable_name = data will store the data in the variable_name. You can put any strings into variables and concatenate them as the following code-10.
You cannot, however, concatenate strings and numbers. A place on the computer, i.e., a variable, recognizes upper and lower case letters as different.
It is customary to use lowercase for variable names. Multi-byte characters using for a variable name will result in an error. Variable names may begin with a letter or an underscore (_), but not with a number.
name1 = "Chikako"
name2 = "Takeishi"
print(name1 + " " + name2)
標準入力,型の変換,関係演算子/Standard Input, Type Conversion, and Relational Operators
標準入力とは,プログラムが実行環境からデータを受け取ることで,input を用います。 input 関数はデータを文字列として受け取ります。下記のコードを実行すると空欄が出現するので,そこに任意の文字を入力して,入力したデータを input 関数で受け取ってみましょう。下記はコード11です。
Standard input receives data from its environment, using the function input. The input function receives data as a string. Run the following code-11 and a blank space will appear. Enter any string in the space as data to be received by the program.
name3 = input()
print(name3 + "にお知らせです。")
name3 = input()
print(name3 + " received a message.")
第4は,型の変換です。Pythonの数値には主に2つの型(正確には3つの型)があります。整数型と浮動小数点型、(3つ目は複素数)です。
整数(integer)にはint関数で,浮動小数点数 (floating point number)にはfloat関数で変換できます。文字列型 (string)には,str関数で変換できます。
つぎのコードの標準入力に任意の値を入力し,実行してみましょう。入力した値は戻り値となりますが,コードの 2 行目は実行されず,入力値に 1 が足された値は返されません。なぜでしょうか? それは上記で説明したように,input 関数は入力値を文字列として受け取るため,そのままでは計算できないからです。コード12を参照してください。
The fourth step is about converting type. There are two main types (three to be exact) of numbers in Python: integer and floating point (and the third being complex numbers).
The int() function converts to integers and the float() function converts to floating point numbers. To convert to the string type, use str() function.
Enter any value into the standard input of the following code-12 and run. The input value is returned, but the second line of code doesn't return the result of the input value plus one. It is because, as explained above, the input function receives the input value as a string and a calculation is not possible with a string.
number1 = input()
print(number1 + 1)
したがって上記コード 2 行目の計算を可能にするには,input 関数で受け取った入力値が代入されている number1 というオブジェクトの型を,文字列から整数に変換してあげる必要があります。以下のコード13を実行してみましょう。
Therefore, to enable the calculation in the second line of code above, it is necessary to convert the type of the object "number1" to which the input value is assigned, from a string to an integer. Let's run the code-13 below.
number1 = input()
print(int(number1) + 1)
第5は,関係演算子です。
The fifth step is about comparison operators.
n = int(input())
n <=  19
3. 基本アルゴリズムのフローチャート/Flowcharts of Basic Algorithms
順次・分岐・反復/Sequence, Selection, and Iteration
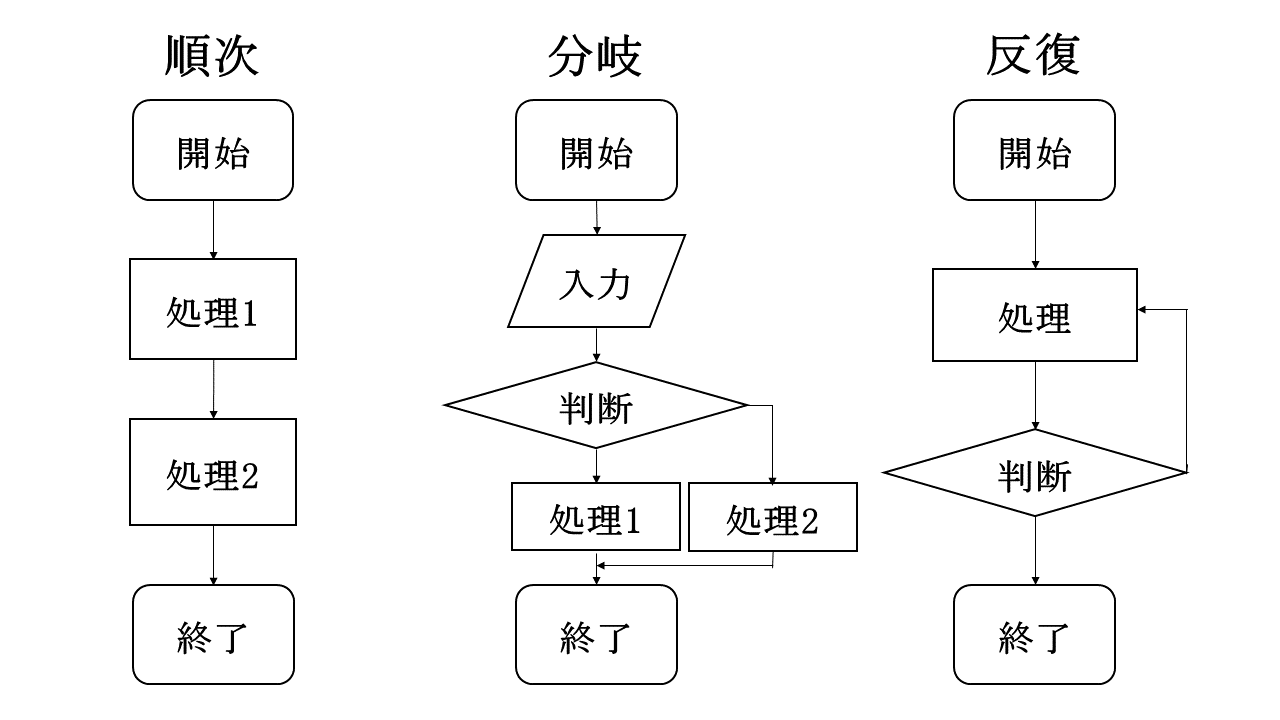
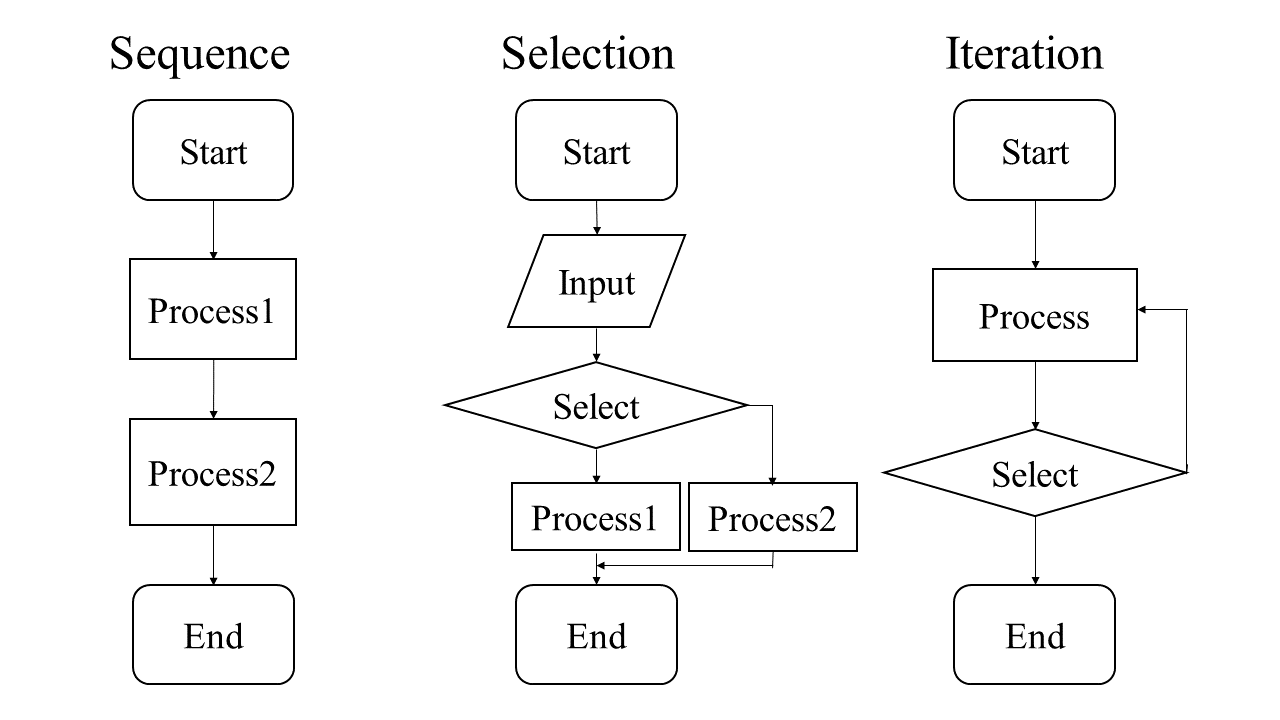
プログラミングで用いる基本のアルゴリズムは,順次と分岐と反復の3種類です。
Three basic Algorithms used in programming are sequence, selection, and iteration.
if 文による分岐/Selection by If Statement
第6は,制御フローについてです。ここでは分岐と反復の複合文である if と for を実習します。コードの書き方の特徴は,条件を設定したコードに半角コロン(:)を付し,その条件下で行われる処理については,インデント(段落を下げた表記)にします。インデントは自動的に挿入されることが多いですが,自分で入力するときにはTabキーを用いず,スペースで入力することをお薦めします。
他のプログラミング言語をやったことのある人は,こういったブロック区切りは{波括弧}で括っていたかもしれませんが,Pythonではインデントです。こういう感じです。
この条件では: 	      ← 行末にコロン(:)
	この処理を行う  ← 行頭が字下げになる
The step 6 is about control flow, and I pick compound statements such as if and for statements for Selection and Iteration. The code line that sets the condition ends with a one-byte colon (:). The indented (paragraph down) part is performed as long as the condition applies. You usually have an automatic indencing, but if you have to make indentation yourself, use spaces, not tabs.
If you've used other programming languages, you might have used {braces} for such block delimiters, but in Python, it's indentation. It looks like this.
Under this condition: 	      ← Colon (:) at the end of line
	Execute this  ← Indentation
では,if関数の場合です。ifとコロンとの間に,関係演算子を使った条件を挟みます。そうするとその条件に当てはまるときだけ,インデントの段落を実行してくれます。
if   関係演算子を使った条件 :
	この処理を行う
たとえば,下のようなコードをColabで実行してみましょう。下記はコード15です。
Now, for if statements, we put a condition between the if and the colon, using some comparison operator. Then it will execute the indented paragraph only when that condition is met.
if   Set a condition with comparison operator :
	 Execute this
For example, let's run the following code in Colab. The following code is code-15.
n = int(input())
if n <=  19:
    print("あなたの飲酒は法律で禁止されています。")
n = int(input())
if n <=  19:
    print("You are prohibited by law from drinking alcohol.")
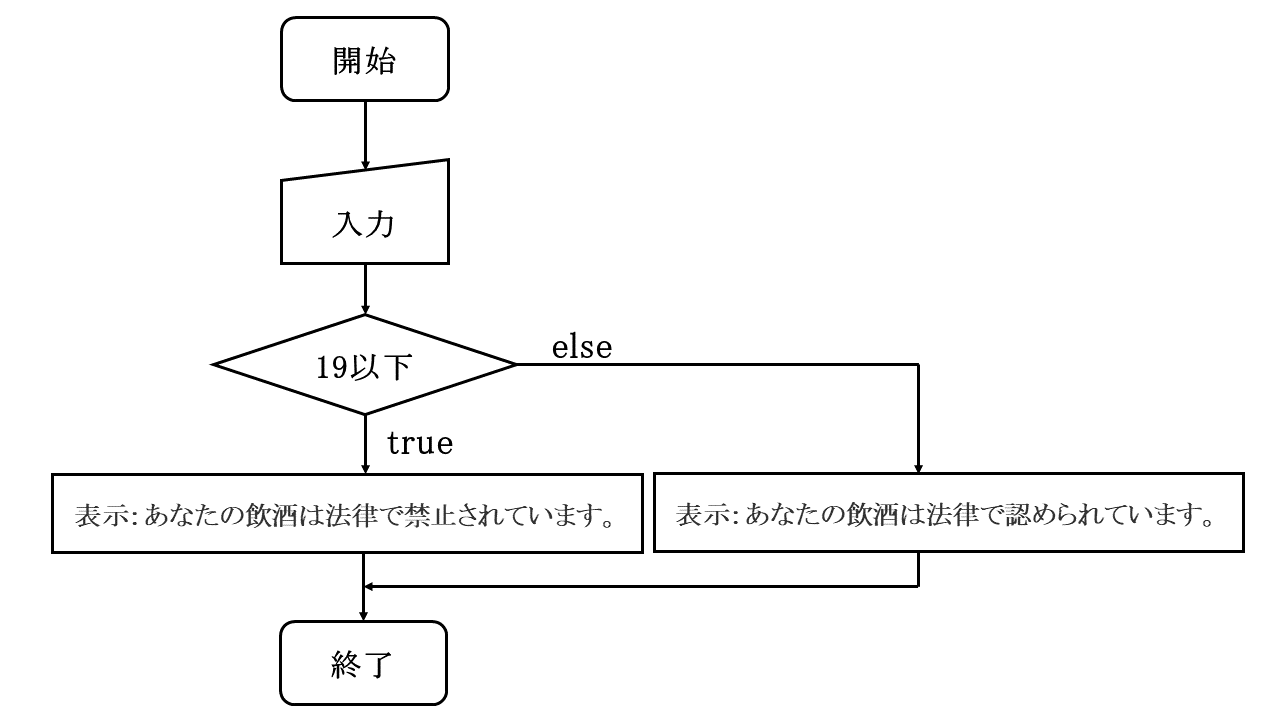
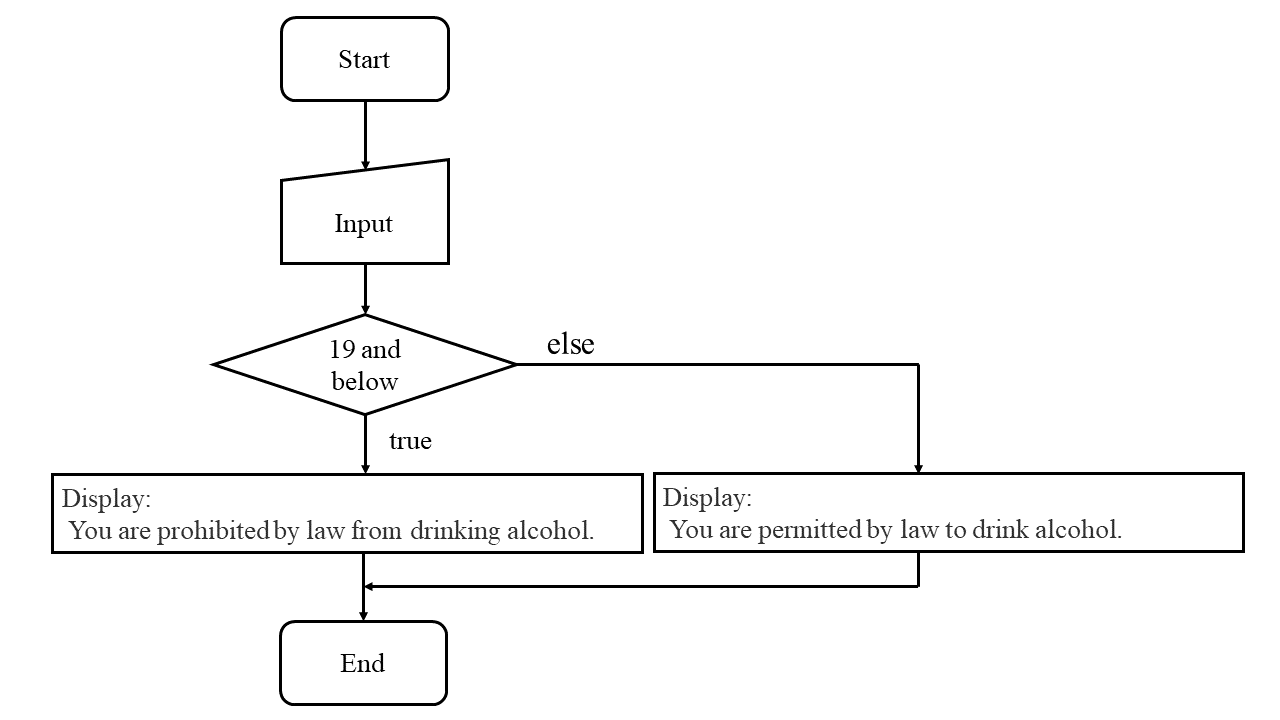
条件に当てはまらない場合の処理を設定するには else を使います。elseの行末にもコロンを付けて,elseの時の処理をインデントします。 フローチャートとコードを下記に示します。下記はコード16です。
To set the flow if the condition is not met, use else. A colon is also added at the end of the "else" line to indent the process for the "else". The flowchart and code are shown below. The following code is code-16.
n = int(input())
if n <=  19:
    print("あなたの飲酒は法律で禁止されています。")
else:
    print("あなたの飲酒は法律で認められています。")
n = int(input())
if n <=  19:
    print("You are prohibited by law from drinking alcohol.")
else:
    print("You are permitted by law to drink alcohol.")
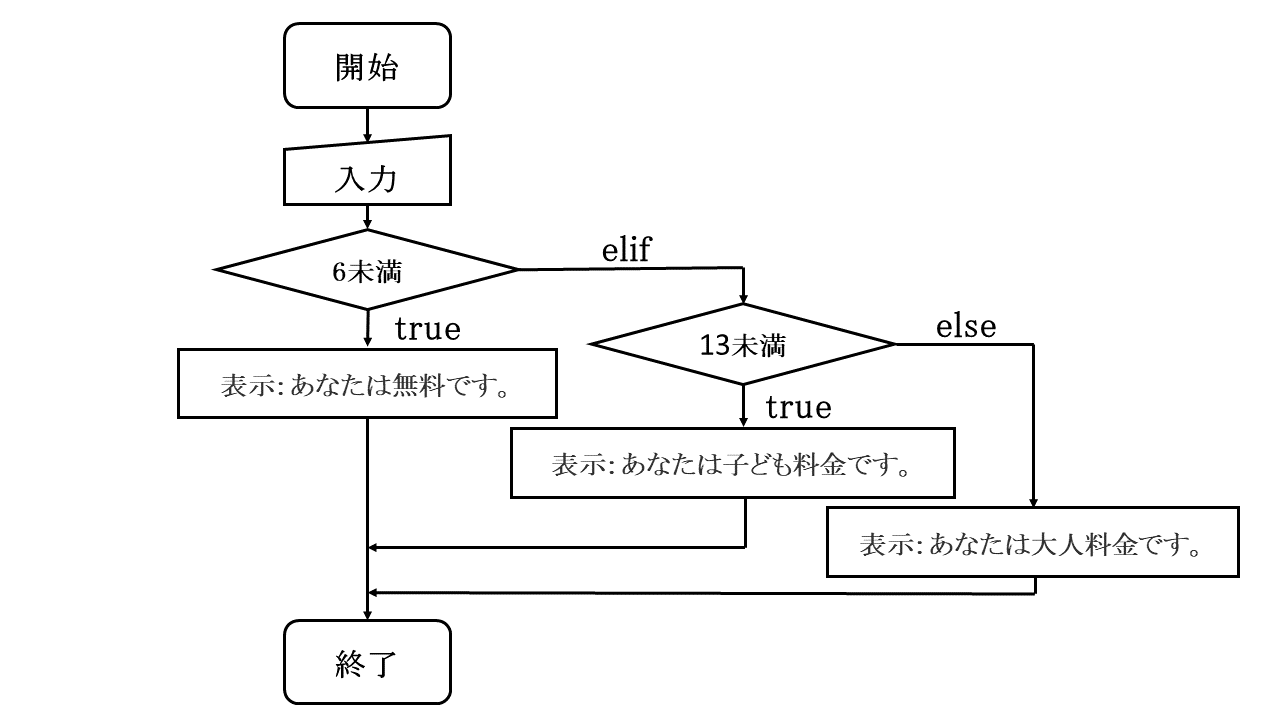
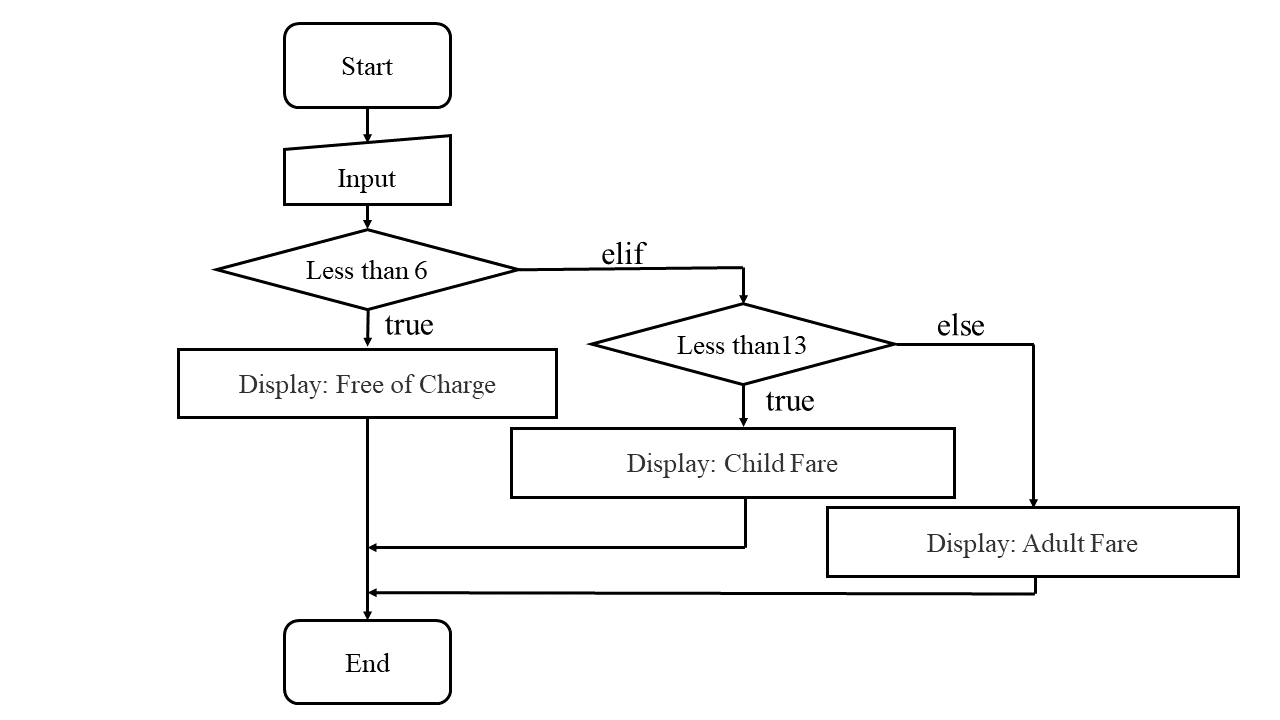
ifとelseの間にelifを挿入すれば,さらに条件を加えていくことが出来ます。下記はコード17です。
Further conditions can be added by inserting elif between if and else. The following code is code-17.
n =int(input())
if n <  6:
    print("あなたは無料です。")
elif n < 13:
    print("あなたはこども料金です。")
else:
    print("あなたは大人料金です。")
n =int(input())
if n <  6:
    print("You are free of charge.")
elif n < 13:
    print("You are child fare.")
else:
    print("You are adult fare.")
For 文によるループ/Loop with for Statement
つぎに,ループ処理のforについてです。ループ処理とは,同じ処理を繰り返すことで,そのためのfor文は以下のような形式をとります。
for ある値 in 範囲: ← ある値がこの範囲内にある間は この処理を繰り返す上の「ある値」のところには変数が入ることもありますし,下記コード18のようにiを入れこともあります。range()の中に数値がひとつの場合は,繰り返しの回数になります。
Next, let's look at for loops. Loop means repeating the same process, and a for statement for this purpose takes the following form.
for  value is  in  range:	  ← While the value is in this range
	Repeat this
The "value" above can be a variable or just i like in the following code-18. If just one number is given for the argument in range(),it will be repeated that number of times.
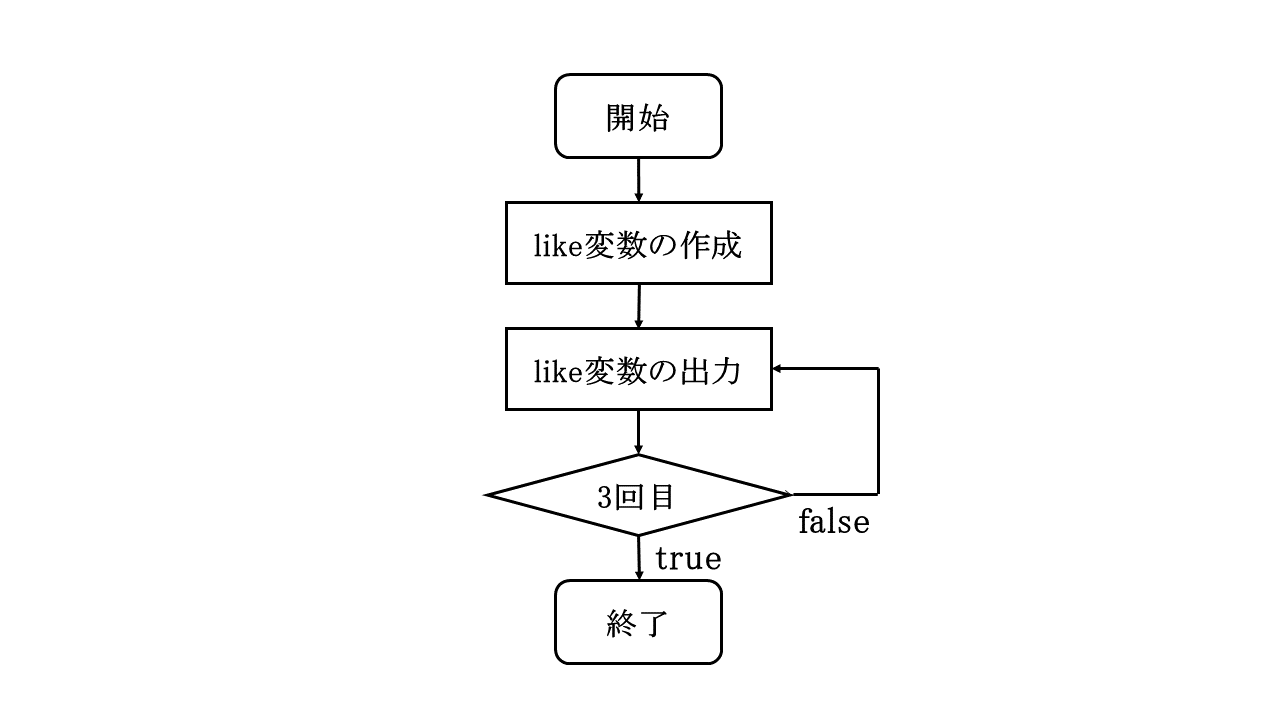

like = "いいね!"
for i in range(3):
    print(like)
like = "Like!"
for i in range(3):
    print(like)
実際に for 文を用いる際には,in のあとに range で回数を指定するよりもイテラブルオブジェクトを用いることの方が多いかもしれません。イテラブルオブジェクトとはイテラブル(iterable),つまり繰り返し可能なオブジェクトのことで,例えばリストのようなシーケンス型のオブジェクトが含まれます。下記はコード19です。
A for statement is probably more often used with iterable objects than range to specify the number of loop repeated. An iterable object is an object that can be repeated, most commonly a sequence-type object such as a list. The following code is code-19.
for i in n:
    print(f"{i}は表彰されます。")
for i in n:
    print(f"{i} will be honored.")
While 文によるループ/Loop with while Statement
ループ処理には while を使うことができます。条件式が真である間,ループを繰り返すのが while 文で,以下のような形式をとります。
while ある条件: 	      ← この条件が真である間は
	この処理を繰り返す
The while statement can be used for loops. A while statement repeats a loop while a conditional expression is true, and takes the following form:
while in a certain condition: 	       ← While this condition is true
	 Repeat this process
下記の例では小学校の各学年初めは何歳かを出力するようにしています。最初に year=1 で 1 年生を設定し,小学生は 6 年生までなので,while 文で学年が 7 未満である 間だけループを繰り返すようにしています。ループされるインデントされた部分では,学年の値に 5 を加えた値を age という変数に代入するようにし,print 関数で,1 年生なら「小学 1 年生は 6 歳です。」と出力させるようにして,最後の行の累算代入演算子で year に 1 を足したものを year 変数に上書きしています。一巡目で year が 2 年生になったの で,インデントされている最初の行に戻って 2 年生は 2+5 で 7 歳となり・・・とループ を繰り返すというコードです。下記はコード20です。
The following example outputs the age at the beginning of each elementary school year. First, year=1 is used to set the first grade, and since elementary school has six grades in Japan, a while statement is set to repeat the loop as long as the grade is less than 7. In the indented lines for the looped process, the school year plus 5 is assigned to the variable age, then print function prints "The first grader is 6 years old" for the first grader, and overwrite the year variable in the last line using the cumulative assignment operator adding 1. After the first round, the year variable becomes year 2, so the code goes back to the first indented line and repeats the loop: students in the 2nd grade is 2+5, thus are 7 years old, and so on. The following code is code-20.
year = 1
while year < 7:
    age = year + 5
    print(f"小学{year}年生は{age}歳です。")
    year += 1
year = 1
while year < 7:
    age = year + 5
    print(f"The elementary school students in the grade [year] are {age} years old.")
    year += 1